I know what you're thinking - "Enough with the
measuring, let's DRAW!", and you're right. First, a word
about what you draw: You can use photographs if you'd
like as subjects, but I strongly recommend drawing real
people. It's a much better learning experience if you
can start with the full three-dimensional subject you
can see from all angles. A photograph only gives you one
angle, that which the photographer chose. I know how
hard it is drawing real people - I've drawn about 10,000
real people. But ask someone you know and I bet they
wouldn't mind sitting for you. You may even find
something out about them you didn't know.
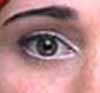
Let's start with the eyes, called the windows to the
soul. It's very important to draw the eyes correctly,
exactly as you see them. The eyes are often the first
things people look at in a portrait and it's best to
make a good first impression. Now remember - we want to
draw the eyes that you are looking at. We don't want the
logical mind to take over and make you draw just "a
generic eye" - we need to draw a specific pair of eyes -
the ones you're looking at. So remember: the instruction
below applies only to the eyes that we're going
to draw - that is as far as what you draw and what
measurements you'll be taking. The general principles
outlined below apply to drawing eyes, the specifics
apply to only these eyes. Can you dig what the cat is
laying down here?
 |
|
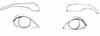
Click the image to see both
eyes |
 Let's
draw the female eyes to the right. Click on the picture
to see both eyes. We will be drawing both eyes to
illustrate how different a subjects two eyes can be. Get
your lap desk out and put a sheet or two of paper on it
and get comfortable in front of your computer. Sharpen
your 5B pencil and have your eraser handy. If you'd like
to print out the eyes go ahead. Let's
draw the female eyes to the right. Click on the picture
to see both eyes. We will be drawing both eyes to
illustrate how different a subjects two eyes can be. Get
your lap desk out and put a sheet or two of paper on it
and get comfortable in front of your computer. Sharpen
your 5B pencil and have your eraser handy. If you'd like
to print out the eyes go ahead.
 Since we'll be drawing
two eyes and starting with her right eye, your first
line should be to the left of the center, top third of
your paper. We'll be adding the nose a bit later, so try
and place the eyes so they will be roughly in the top
third of your paper. First draw the upper lid of the
right eye. Draw a single curved line starting at the
tear duct and ending at the outside corner. Notice that
the outside corner is higher up than the tear duct, so
the two end points of this first line should NOT be
horizontally parallel. Make this arched line about two
inches from end to end. After you're satisfied with this
first line, lightly draw the bottom edge of the eye in a
single line. These two lines establish the eye enough
that you now have your basic unit of measure - one eye. Since we'll be drawing
two eyes and starting with her right eye, your first
line should be to the left of the center, top third of
your paper. We'll be adding the nose a bit later, so try
and place the eyes so they will be roughly in the top
third of your paper. First draw the upper lid of the
right eye. Draw a single curved line starting at the
tear duct and ending at the outside corner. Notice that
the outside corner is higher up than the tear duct, so
the two end points of this first line should NOT be
horizontally parallel. Make this arched line about two
inches from end to end. After you're satisfied with this
first line, lightly draw the bottom edge of the eye in a
single line. These two lines establish the eye enough
that you now have your basic unit of measure - one eye.
In the photograph, measure the width of the eye. Holding
that measure slide to the right and measure the space
between the eyes. These eyes are not average because
there's only about half an eye between them! Keep
sliding the measurement over and measure the other eye.
This eye is about three quarters the width of the first.
Measure the width of the drawn eye with your pencil.
Slide to the right only half an eye and make a small dot
there. This is where the second eye will start. Keep
sliding the measurement over and make another dot at
three quarters an eye, this is the other end of the
second eye. Now looking at the photo, draw the curve of
the upper lid of the second eye, noticing that this
curve is a bit different than the curve of the upper lid
on the right eye (but the outside corner of this eye is
higher than the tear duct, just like the first eye.).
Start the curved line at the first dot and end it at the
second. With that done, draw the lower part of the eye.
 |
|
draw the irises |
With the two eyes drawn and spaced correctly,
very lightly draw a
contour of the iris of the eye. That's the colored area
of the eye. Rather than drawing a
complete circle for the iris, you might want to draw two
semicircles to show that the upper lid is covering a bit
of the iris.
Draw a small line above and below the
outside corners of each eye representing the crease of
the lid. Also, draw contours of the eyebrows. For
placement of the eyebrows, hold your pencil vertically
at each end of the eyebrow and note where it lines up
with the eye. For the height of the eyebrow, measure
from the top of the eye to the bottom of the eyebrow. i
get about half an eye height for that measurement.
Now we have enough line drawings to start shading... |