In the previous exercise of creating a "standard
unit of measure" we already touched on the next exercises
of perspective and proportion.
Before,
using and measuring for perspective and proportion may
have seemed a bit too logical and mechanical to be "artistic".
But in order to accurately depict the world around us we
need to accurately represent the object depths, angles,
and sizes that we see. And the only way to do this is to
measure things. We can somewhat stay away from making
our drawings look too mechanical and stiff by not using
rulers to measure to the exact centimeter. If we make
"crude" measurements using our pencil as the measuring
tool, like we did
previously, we might get a more "organic"
feel to the drawing. Many people say that when they
try to draw their drawings always end up looking flat.
The drawing doesn't have any "depth" to it. This is
probably because the principle of Perspective was
ignored or done not quite right. Many of the paintings
and drawing created in the period ranging from the first
century A.D. to about the 14th century looked pretty
flat for the same reason: it looks to me like they
didn't understand perspective.
A very basic definition
of Perspective is: Objects appear larger when they are
closer to your eye than objects that are further away
from your eye. And also elements that comprise a single
object appear larger if the element is closer to your
eye than the other elements making up a whole object.
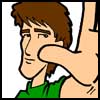
That means if a friend stands at arms length from you
and raises their palm to your eye, their hand will look
significantly larger to you than their head. But you
know that is not the case, it just appears that way
because their hand is closer to your eye than the rest
of their body. In DRAWING: Perspective is being able
to correctly depict three dimensional space in the
confines of a two dimensional, flat surface (your paper).
This is done by drawing closer objects larger than
objects that are more distant. If objects closer to
you look larger than objects farther away from you, then
it seems logical that the further an object gets from
you it gets so small that you cannot see it any more.
Right? Right - that's exactly what happens. The point at
which an object gets so far away that it's no longer
seen is called the Vanishing Point. And the
vanishing point will fall on the Horizon Line.
The horizon line is where the sky appears to meet the
Earth. The horizon line can also be seen when you're not
looking at the point where the sky meets the Earth. You
can see it right in front of you. As you look straight
ahead - you'll see the front faces of objects on the
Horizon Line. And the objects may appear to have only
two dimensions: Height and Width. Above the Horizon
Line, you'll see the bottoms of objects, and you'll see the tops of
objects that are below the Horizon Line. When you look
below and above the Horizon Line you will add the third
dimension to the object that you see: Depth - the
distance from it's front to it's back. In drawing,
we'll use both the vanishing point and the horizon line.
In order to accurately show perspective, what you do
first is find your horizon line in the drawing, then you
draw several straight lines from the top, middle, and
bottom of the object you're drawing that go all the way
to the horizon line. Where the lines converge at the
horizon line is your vanishing point. The trick then is
to draw the object so that the various planes and
surfaces of the object are in line with the lines you've
drawn that merge at the vanishing point on the horizon
line. To start, lets draw simple geometric shapes in
perspective then after time you can build up to more
complex shapes. |