Drawing shading for metal and glass could be both
fun and frustrating. These surfaces are usually smooth,
so they should be fun and easy to render, but they're
also reflective, which could be frustrating. Metal is
oftentimes a reflective surface, you can see the world
being reflected back at you like in a mirror when you
look at a polished metal surface. So if you want to be
as realistic as possible when drawing the shading of a
metal surface, you should also draw the reflections you
see too. Glass also can have a reflective look as well -
that's the whole concept of a mirror after all -
reflection. But if you're looking at glass that is
translucent, glass that you can see through like a
window, or a translucent glass object like a drinking
glass, then you're not really drawing reflections, but
rather whatever is seen behind, below and around the
glass object.
 |
|
Click to enlarge |
Metal
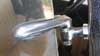
 Let's look at metal first. I'm going to use cars to
illustrate drawing metal, and first up is a 1931 Ford
Model A. The image to the right is the upper metal
bracket that holds the side window. I chose this object
because it's not an intricate object with lots of
surface variation. First draw your contour drawing of
the bracket. When I draw objects that have lots of
straight edges and lines, if I don't have to be precise,
I'm not. With this object I eyeballed the measurements and I drew
the straight lines slowly to get them as straight as I
could. Once you have your contour drawing done go ahead
and start lightly shading in the dark shadow areas.
Again, don't blacken the shadows completely, you can
always go back and darken them if you think they're too
light. Unlike the previous shading examples we've
created, when drawing reflective surfaces like metal,
you don't have to lay down a base middle grey shade over
the entire object. This is because often with reflective
objects, the contrasts are pretty high; the highlights
are very white, and the shadows are very dark. So you
can use the white of the paper to be your highlights -
that's less drawing! I also will draw in what I call
"reflection shapes" - the shapes that you see the
shadows and highlights creating on the object. It's the
same idea as shadow shapes from drawing fabric shadows.
So draw your reflection shapes and shade in the shadows
and midtones. Keep going with the shading by darkening
the shadows as you add the midtones. The last step in
shading metal is to use your blending stump (or your
finger). You'll notice that since the contrasts are
pretty high, the edges of shadows are often very sharp.
But since your drawing reflections, in some areas the
shadows may be soft. It's in the soft areas that you
want to use your blending stump and blend and soften the
softer shadows on the object. IN this particular object,
the top of the arm and the top of the hinge have softer
shadows, so I used the blending stump there.
Click the
picture above to see the process. Generally,
the softer you make the shadows on a reflective metal
object, the less shiny the object will appear. A really
shiny object will have very sharp shadows and high
contrasts. Let's look at metal first. I'm going to use cars to
illustrate drawing metal, and first up is a 1931 Ford
Model A. The image to the right is the upper metal
bracket that holds the side window. I chose this object
because it's not an intricate object with lots of
surface variation. First draw your contour drawing of
the bracket. When I draw objects that have lots of
straight edges and lines, if I don't have to be precise,
I'm not. With this object I eyeballed the measurements and I drew
the straight lines slowly to get them as straight as I
could. Once you have your contour drawing done go ahead
and start lightly shading in the dark shadow areas.
Again, don't blacken the shadows completely, you can
always go back and darken them if you think they're too
light. Unlike the previous shading examples we've
created, when drawing reflective surfaces like metal,
you don't have to lay down a base middle grey shade over
the entire object. This is because often with reflective
objects, the contrasts are pretty high; the highlights
are very white, and the shadows are very dark. So you
can use the white of the paper to be your highlights -
that's less drawing! I also will draw in what I call
"reflection shapes" - the shapes that you see the
shadows and highlights creating on the object. It's the
same idea as shadow shapes from drawing fabric shadows.
So draw your reflection shapes and shade in the shadows
and midtones. Keep going with the shading by darkening
the shadows as you add the midtones. The last step in
shading metal is to use your blending stump (or your
finger). You'll notice that since the contrasts are
pretty high, the edges of shadows are often very sharp.
But since your drawing reflections, in some areas the
shadows may be soft. It's in the soft areas that you
want to use your blending stump and blend and soften the
softer shadows on the object. IN this particular object,
the top of the arm and the top of the hinge have softer
shadows, so I used the blending stump there.
Click the
picture above to see the process. Generally,
the softer you make the shadows on a reflective metal
object, the less shiny the object will appear. A really
shiny object will have very sharp shadows and high
contrasts. Glass
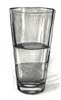
Now let's look at shading glass by drawing a, well,
glass. Drawing shading on glass is similar to drawing
shading on a reflective metal object because in both
cases you're drawing reflected objects. But when you're
drawing a clear glass objects, you're drawing the
reflections of the objects behind the glass because you
can see through the glass. An interesting observation
about drawing glass is that the shadows on the edges of
the object are heavier than the shadows in the middle of
the object. This is because as the contour of the object
curves away or towards your eye, you begin to see the
side of the glass, the glass appears to become more
dense because you're looking at it's side, and so the
shadows become more dense as well.
 |
|
Click to enlarge |
Begin
by drawing the contour of the glass. You'll notice in my
contour drawing there's an S shaped curve about two
thirds the way down the glass. That's the horizon line
as seen through the glass. The horizon line is being
distorted as seen through the cylindrical shape of the
glass. Next begin to lay down your shadows. In this
drawing you can lay down a middle grey tone through the
whole glass and leave the paper white where you see the
highlights in the glass. Keep gradually darkening your
shadows. As you darken, the highlights will begin to pop
out more. because most of the shadows in this example
are fairly soft, you can use your finger or a blending
stump to smudge your shadows. Notice that the shadows in
the thick base of the glass, and along the sides are
pretty sharp, so you shouldn't smudge those shadows. If
you've blended away the highlights, take your eraser and
erase the excess blended graphite so that your
highlights pop again.
 |
|
Click to enlarge |
So this has been a pretty intense look at shading in
drawing. In realistic drawing shading is what really
makes the drawing pop off the page. And if you get
really good as shading, you can make any drawing look
like it was done by a trained artist. Shading is my
favorite part of drawing, and maybe now it's yours too!
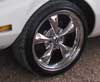
If you'd like, you can practice shading by drawing the
wheel here. This drawing will require you to use a few
different shading techniques that you've learned.
|